This blog post answers your most obvious question on how to write the first blog post. In our last post, we discussed how to create a blog on Google Blogger. Walking down further on a progressing path I assume, by now we have chosen a topic for the blog, noticeable title, impressive theme, and content required to write the first blog post.
Our aim at Blogging Hacks is to provide quality information on various aspects of blogging. In our first blog post, we discussed creating a blog on Google Blogger. Here is the link to Registering your Blog on Google Blogger.
The first blog post is very valuable from the point of view that it is the first time we interact with our audience. It is like making the first impression and it has to be great. The first impression happens so fast and once made is difficult to change in many situations.
Hence, it is significant to make our first blog post impressive while we are introduced to the audience. Let us understand the key elements that should be mentioned in our first blog post.
- Introduce yourself to the visitors
The Internet is a vast ocean of knowledge. So if someone comes to our blog, give him or her a valid reason to trust and follow you. This trust can be built by following a simple approach. We will introduce a couple of things in our first blog post.Writing a brief introduction is the first thing that we will not miss in our first blog post. Rather than trusting an unknown author, we will always prefer to get the information from an authenticated source. An introduction helps to establish trust with your audience.
An introduction can comprise your name, country of origin/residence, your qualification, your expertise, is this your first blog, what type of content your audience will see on the blog, and your hobbies are so they can socially and mentally connect with you.
Adding a decent photo to your profile is equally important so that our visitors have an idea with whom they are interacting. In addition, it refrains visitors from listening to an imaginary, invisible person. We will like to develop a friendly relationship with our readers and be acquainted with them.
- Let your visitors know the purpose
The second thing we will mention in our first blog post is that the purpose of writing various blog posts or having a blog. Visitors have a certain expectation from your blog and it is good to know that if they have landed at the right place. Additionally, your visionary proposition could influence the visitors and make them your regular readers. Let readers know about the background you come from, skill sets you have, and what is your experience, which could benefit them in a blogging endeavor.
The purpose of blogging could mention about writing in a specific domain like digital marketing, search engine optimization, travel, health tips, or covering a wider domain like everything that has to do with blogging, writing a backend code for a blog, SEO, digital marketing, etc.
- What are you blogging about?
A new blog has less or to say no content at the beginning stage. Hence, mentioning the niche or type of content visitors will see in the coming time right from the beginning stage becomes even more crucial.
On the other hand, I as a reader would be interested to know what type of content I will be seeing in future posts if I like a particular blog. Hence to keep such loyal readers tied together, mentioning what you will be blogging about becomes necessary.
As a new blogger, keeping visitors hooked up to your blog right from the beginning and slowly increasing the reader base is a righteous approach to become successful. Hence, we will explain to our visitors our vision and what content they can expect from you.
The first blog I created on Google Blogspot got visitors in a good number only when I introduced this blog with my college group, which multiplied later. I shared at regular times what content I am hosting on this blog and what to expect in the near future.
Perhaps, the blog was successful only because I was able to keep my readers engaged by informing them at the right times and fulfill their requirements. Today, we have many platforms to inform our audience and get traffic to the blog. Getting traffic to a new blog has become much easier now. Know how to get traffic to your new blog by following this link.
We should mention these a few important things in our first blog post. This helps to build an initial bond with the audience, which could slowly grow in the later phase of the blogging.
Further, in the post, we are going to be acquainted with the blog editor window and write our first blog post. So, without further delay, let us move on to it.
We have seen how a Dashboard screen looks like in the post Registering your Blog on Google Blogger.
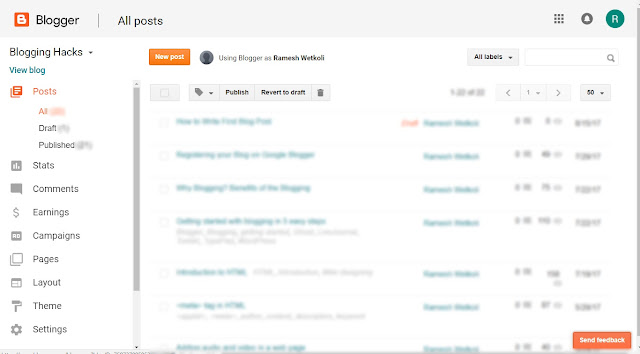
Click on the Posts menu option from the left panel of your browser screen indicated in the below screenshot. It will show three list categories i.e. posts, which are in the draft phase, published posts, and all posts, which consist of, published, and draft posts together. For new users, there would not be any posts listed under these categories until we create one.

You will see an orange color button to create a New Post. Click on it and it will take you to the post-editor page. The post-editor page looks like any text-editor you might have worked upon. With the help of this editor, we will write content in order to create web pages for your blog. The only difference with that to conventional text-editor is besides saving the final document into word or text file we will be creating a new post (web page).
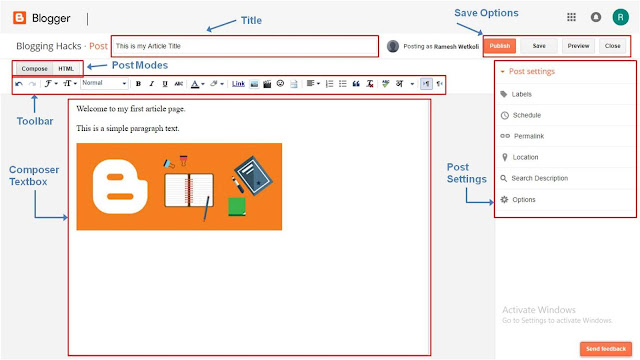
Let us put some light on the post editor page. Please have a look at the below screenshot and let us unravel these sections.

On the top row, you will see a textbox for the title of your blog post. This title will be displayed above the post content as well as in the title bar of your browser screen after publishing the article.
Post title also plays a very vital role in displaying your web page in search engine results. The better the title more likely to have visibility in search results. Hence always write a descriptive title in one line or a maximum of two lines while creating the post rather than ending it within 2-3 words.
Click on the Posts menu option from the left panel of your browser screen indicated in the below screenshot. It will show three list categories i.e. posts, which are in the draft phase, published posts, and all posts, which consist of, published, and draft posts together. For new users, there would not be any posts listed under these categories until we create one.

You will see an orange color button to create a New Post. Click on it and it will take you to the post-editor page. The post-editor page looks like any text-editor you might have worked upon. With the help of this editor, we will write content in order to create web pages for your blog. The only difference with that to conventional text-editor is besides saving the final document into word or text file we will be creating a new post (web page).
Let us put some light on the post editor page. Please have a look at the below screenshot and let us unravel these sections.

On the top row, you will see a textbox for the title of your blog post. This title will be displayed above the post content as well as in the title bar of your browser screen after publishing the article.
Post title also plays a very vital role in displaying your web page in search engine results. The better the title more likely to have visibility in search results. Hence always write a descriptive title in one line or a maximum of two lines while creating the post rather than ending it within 2-3 words.
While writing your blog post you can choose to write a post in HTML or compose mode. The two buttons on the left side, below the title bar i.e. "Compose" and "HTML" let you switch between these two modes.
If you choose an HTML mode, your post editor window will show you the HTML code of your post and you can continue writing the same if you are familiar with HTML programming. Otherwise, choose 'Compose mode', write the post as you write in any text editor and Blogger will do coding part for you in the back-end.
There exist a toolbar below the post title, as any text editor has to format the post content. Mouse hover on each icon to see what these options are used for. If you want to have a better look in detail, below is the description:
 Undo button will take you to one step backward from the current change done in the document. Redo button will take you one step forward if you have already gone into the previous state of the post.
If you choose an HTML mode, your post editor window will show you the HTML code of your post and you can continue writing the same if you are familiar with HTML programming. Otherwise, choose 'Compose mode', write the post as you write in any text editor and Blogger will do coding part for you in the back-end.
There exist a toolbar below the post title, as any text editor has to format the post content. Mouse hover on each icon to see what these options are used for. If you want to have a better look in detail, below is the description:
 Undo button will take you to one step backward from the current change done in the document. Redo button will take you one step forward if you have already gone into the previous state of the post.
 The font-family tool will let you change the font for the selected text. You can use this tool to set a new font for the text that you are about to write. The new font will be displayed from the current cursor position.
 The font size tool will let you set the size of the font text.
  With the help of the heading level tool, you can define different levels of headings in a post.
  Bold, Italics and Underline tool respectively let you set the text in bold, italics, and underlined format.
 Strikethrough tool as the name suggests puts a line through the text that you have selected.
 The font color tool lets you color the text that you have selected.
 The background color tool lets you set the colored background for the selected text.
 You can add a hyperlink to text, image, or any other object you have selected with the help of the link tool.
 The image tool will let you add an image/picture into a document.
 Video tools will let you insert a video into your article.
 Symbol tool has emoji icons and whole sets of symbols you would like to insert into your post.
 Let us assume that you have a longer text of paragraphs for the visitor to read. However, you would let the blog-visitor decide whether to continue reading by giving him a shorter text and add a link next to it to continue reading. Jump-break tool adds this break-point in a long paragraph from where an initial text is separated and the rest of the text is displayed upon clicking on jump break.
 Align tool lets you aligned elements into four ways. i.e. left, right, center, and justified.
 You can add a number or bulleted list into your post with the help of the list tool.
 A user can add quoted text with a little different style than the surrounding text with the help of this tool.
 Remove formatting tool removes all sorts of formatting you have applied to the text. Whether the text is bold, colored, bulleted will be undone and will be presented in plain text format.
 A user can check spellings of the post text with this tool before publishing it live.
 This symbol could be different in your post editor window depending upon language preferences you have set in the Settings menu. This tool lets you set the language to write text in the regional script.
 With this tool selected, your post text will flow from left to right.
  Enable this tool if someone wants to write a post in Urdu or Hebrew like languages, where text normally flows from right to left direction.
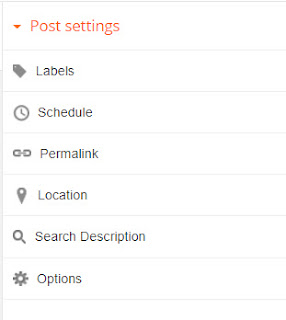
 There are few more post setting options on the right side of your post-editor window. Once you have completed writing your blog post, have a look at the right panel, and understand these menu options before posting your article live.

Labels let you categorize your posts. For example, you have written posts on cooking recipes. You may want to categorize them into soup, dessert, Italian, Chinese, Indian, Thai, etc. categories. Your site visitors will have better accessibility when they want to see a post from one particular category. Clicking on a soup label will display all posts labeled with the term soup.
Add two to three labels that are closely related to your blog articles. Labels have no influence ranking in search engine results. Hence, do not flood this textbox with too many labels. Note, meta keywords and labels are two different things.
Schedule option lets you set future-date for the go-live of your blog post. Once set the date, time, and finally clicking upon Publish button that post automatically is published on the specified date and time without your intervention.
Permalink option lets you set the text, which will be displayed in the URL. Normally it picks up the title text of your blog post. However, if you want to customize it you can do so by choosing the Custom Permalink radio button under the Permalink menu.
Always choose a custom option to see if all text is rendered as the title text of the post. A well-written descriptive URL has better readability and helps rank better in search results.
The Location option lets you add location related to your post. This menu option lets you search Google maps for a geographic place to associate with your post.
Search Description is basically a sentence that has post keywords and a short description of your blog post. It is good to have a description text as it helps to improve the SEO of your blog post. If this text is not set, the search engine picks up the few initial lines from your post, which is not ideal in every case.
Finally, Options let you set the settings for visitor's comments that will be displayed after the post. Whether to allow comments, backlinks (links from the visitors to your post), process HTML and render output in comments, use tag explicitly for taking text over a new line, or let enter button do the work, all this can be set under the Options menu.
With all the steps done as above, you are ready to take a preview of your blog post before publishing it. Click on the Preview button to take a look at how your final post will look in a browser after publishing. Make any final changes if you want to make and publish it live.
If you want to save your post in draft and publish it some other time, you can do so by clicking on the Save button.
Conclusion:
We have touched all the points on how to write the first blog post. Please let me know through your comments if you have any queries unanswered. I will be happy to answer them.
In our next article, we will have a look at How to Write a Perfect Blog Post.
Wishing you all the best for your first blog-post and many to come! 😊


1 comments
This comment has been removed by a blog administrator.
ReplyDelete